require([“mojo/signup-forms/Loader”], function(L) { L.start({“baseUrl”:”mc.us9.list-manage.com”,”uuid”:”b7b276c3b84c589b18565218d”,”lid”:”195f385bfe”}) })If you are new to using Learning Goals and Scales, or you are being forced to use them by your district/administration, you may feel reluctant or overwhelmed. Using the Scaled Assessments, or Assessments with Learning Goals and Scales, can make this much more simple!
Step 1: Know Your Learning Goals!
Learning Goals are simply statements of what the students should learn. It helps them and you focus on what’s most important to spend time on. They can be versed a number of different ways, and range from small discreet skills, to large sweeping generalizations. This was hard for me to wrap my head around at first, so I started simple, I wrote sentences on the white board everyday at the beginning of class. The kids would copy them down on a weekly “Reflection Sheet” or learning log.
Step 2: How will you present your Scales?
These learning goals and scales are based on the research and suggestions of Robert J. Marzano, in The Art and Science of Teaching: A Comprehensive Framework for Effective Instruction. Learning Goals and scales follow this basic structure;
I found it easiest to start with a general scale for every learning goal since I hadn’t had the time to create unique ones for different subjects. I posted this in my classroom for the kids to refer to.
Once the kids know the scale, they can talk about where they think they’re at. Some of my fifth grade colleagues had the great idea of having kids write on the reflection sheet, where they started and where they ended for each unit or lesson so they could document their growth. This is an informal approach because the students are assessing themselves according to their own interpretation. Below you can see what this might look like.
If your students don’t have reflection sheets, you can also ask them informally; you say something like “Show me on your fingers where you think you’re at right now.” (You might want kids to do this on their chest or under their chin for more privacy.)
I wasn’t as comfortable with the informal method. I felt like it is important for kids to learn to assess themselves, and it’s great for making snap decisions about what to do with my next few minutes of instruction; but kids this age are still learning to be self-aware, and they don’t often have the background knowledge to be objective; some are overly confident, and some will feel insecure about their learning no matter how smart they are! So, I continued to use the informal scales on the board, and fingers in the air, but I also developed a concrete scale for the grade levels I taught so I could feel organized and give the kids real examples of what it means to make progress! Below are some examples of the posters I made. Grades 3-8 are available at Mrs. L’s Leveled Learning Store.
Step 3: How will you Assess kids with Scales?
These learning goals and scales are based on the research and suggestions of Robert J. Marzano, in The Art and Science of Teaching: A Comprehensive Framework for Effective Instruction. Learning Goals and scales follow this basic structure;
These posters align with grade-level assessments I created so that I could present a consistent and concrete way of presenting each standard to students. The grade-level tabs for this blog will give you some more examples of the assessment pages and student work.
Follow the link below each assessment to get a FREE set of posters for one math cluster. Links lead to same grade-level. Grades 3 & 8 coming soon!
4th Grade
5th Grade
6th Grade
7th Grade
Step 4: How will you track kids progress with Scales?
My first attempt to create a tracking sheet for the scales was very old-school. I made a simple chart in a word doc. This summer I upgraded the word docs to color-coded excel spreadsheets with links to the common core standard descriptions for quick reference. Now they look like this…you can use the sorting function to group your students for differentiation.
Step 5: How can kids track and record their own progress with Scales?
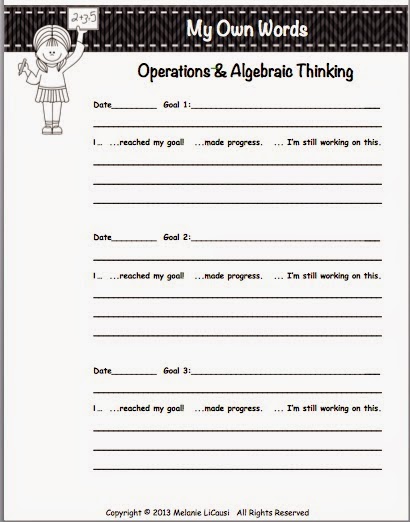
Portfolios were something I always wanted to incorporate in my classroom because they are so awesome when parents and administrators come in with questions like “What are your kids doing all day?” But getting organized was another story. I only got as far as math before I had my second baby, but below are some examples of the portfolio dividers I made for kids. Each kids received a binder at the beginning of the year with their own copy of the Assessments (This binder NEVER left my classroom!), and these portfolio pages to divide each cluster. I would copy the binder pages onto colored paper, and the kids would cut out the portions that needed removing. We would skim through it a the beginning of the year, so they could see what was coming. After I gave the assessment as a pre-test, we would record the kids’ initial scale scores and make 1 personal goal for growth. Initially I made a space on the back to make goals for every standard, but this was way too time consuming and too huge to give the kids a realistic focus for improvement. This summer I revised them to include 3 goal spaces for each cluster. After the post-test (I used the same exact test because it is scaled!), we recorded their final scale scores and reviewed their goals. Some kids will still need time to master every standard. That’s okay. At least they have a concrete way to flip through the standards and see where they left off o each one. The Assessment were sorted and filed according to cluster with the binder tabs. Parents LOVE this for conferences!! It also saved me some explaining.


Search for Grades 4-7 in my store. Grades 3 & 8 Coming Soon!
Step 6: Enjoy feeling organized!


